Cycling Presets
Using Cycling Presets—a Simple Example
As presented in this category’s overview, the cycling preset features allows setting up camera configurations that can change dynamically and repeatedly, with minimum overhead. The features that change along with the trigger for the feature change are preprogrammed in the camera. Additionally, a set of preset features can be updated while the camera is acquiring with a different preset. Such dynamic feature changes allow applications to perform tracking algorithms.
The following example describes a simple cycling sequence (using free running acquisitions) with exposure change steps which will repeat until stopped by the user. This example uses the Sapera tool CamExpert to set features and test the sequence.
Multi-Exposure Cycling Example Setup
In the Sensor Control category set the following features as follows:
-
Acquisition frame rate: 20 fps
-
Exposure time that’s somewhat short (dark).
In the Cycling Preset category, set the following features as follows:
-
cyclingPresetMode to Active. This feature enables the Cycling Preset Module.
-
cyclingPresetCount to the number of presets to configure and use. For this example, set this to 4.
-
cyclingPresetIncrementalSource to StartOfFrame. The event will be used to increment the cycling presets index and is a logical choice in a free-running acquisition setup.
-
cyclingPresetRepeater to 20. This represents the number of incremental source events to count before switching to the next preset. In this example we are counting StartOfFrame events, thus a value of 20 (with a test setup of 20 fps) will switch presets every 1 second.
-
(optional) cyclingPresetResetSource to EndOfAcquisition. This defines the event which will reset the preset index back to 1. In this example, setting the feature to EndOfAcquisition returns the cycling preset index to the start (1) when the Acquisition Stop feature is clicked in CamExpert to stop acquisition.
-
PresetConfigurationSelector to index 1.
-
FeaturesActivationSelector to ExposureTime (the exposure initially set as somewhat dark).
-
FeaturesActivationMode to Active. This defines the camera exposure as one variable stored in this preset index 1.
-
ExposureTime shows the last exposure time used by the camera (when cycling was not enabled). This field now controls the camera exposure time. The primary exposure time field in the Sensor Control Category is in gray text indicating a read only field.
-
Set PresetConfigurationSelector to index 2.
-
Set ExposureTime to a higher value, increasing the acquisition brightness.
-
Repeat for index 3 with an exposure a bit longer again, and index 4 with an even longer exposure.
Testing the Example
-
With 4 different exposure times saved in four presets, click the CamExpert Grab button to start the cycling free-running acquisition.
-
The CamExpert live display window will show a live grab of 20 fps, where each second shows a four step increase in exposure, which then returns to the first exposure cycling continuously until stopped by the user.
Cycling Reset Timing Details
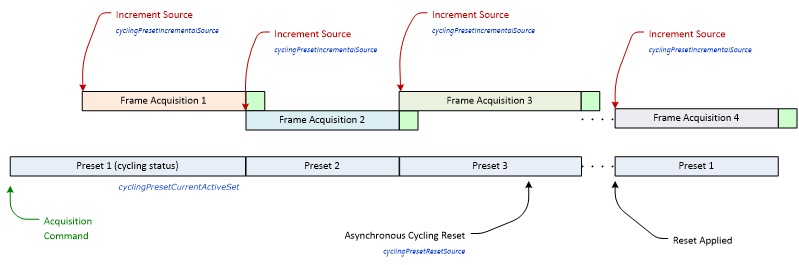
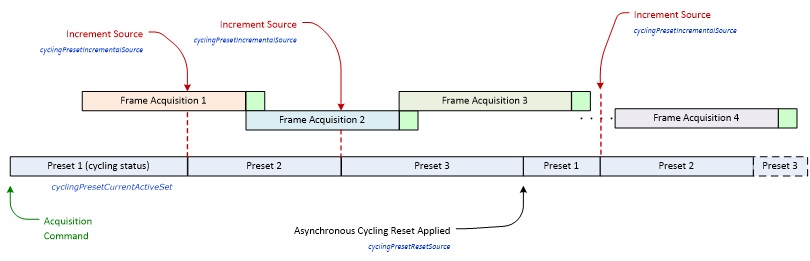
This section describes the Nano-10G Cycling function with two cycling feature configurations. These configurations (or cases) are dependent on the cycling preset increment source as follows:
-
Internal Synchronous Increment: Where the preset increment source is either Start of Frame or Valid Frame Trigger (cyclingPresetIncrementalSource= StartOfFrame or ValidFrameTrigger).
-
External Asynchronous Increment: Where the preset increment source is either Timer, Line or Software (cyclingPresetIncrementalSource= Counter1End or Line2 or None).
Case 1: Cycling with Internal Synchronous Increment
With an Internal Synchronous Cycling Increment, a cycling reset command will execute on the next cycling increment event.
Case 2: Cycling with External Asynchronous Increment
With an External Asynchronous Cycling Increment, a cycling reset command executes immediately and sets the cycling preset to set number 1.
Using Cycling Presets with Output Controls
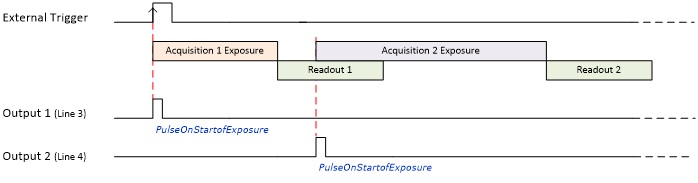
The following graphic shows a Cycling Preset function setup where a two stage setup performs exposures of different length and additionally provides an output pulse at the start of each exposure. As an example, by using both output lines, this setup can trigger two separate light strobes of different wavelengths. This dual exposure sequence example is controlled by a single external trigger.
Example Feature Settings
Below are listed key features for this setup. Other Nano-10G features will be as required by the user.
-
I/O Controls
-
TriggerSelector = FrameBurstStart
-
TriggerMode = On
-
triggerFrameCount = 2
-
Cycling Preset
-
cyclingPresetMode = Active
-
cyclingPresetCount = 2
-
cyclingPresetIncrementalSource = StartOfFrame
-
cP_FeaturesActivationSelector = ExposureTime
-
cP_FeaturesActivationMode = Active (plus set required exposure for each cycling preset)
-
cP_LineSelector = Line3 (for preset 1) and Line4 (for preset 2)
-
cP_OutputLineSource = PulseOnStartofExposure (line3–preset 1, line4-preset 2)
 ©
©