10-pin I/O Connector Pinout Details (Special Order)
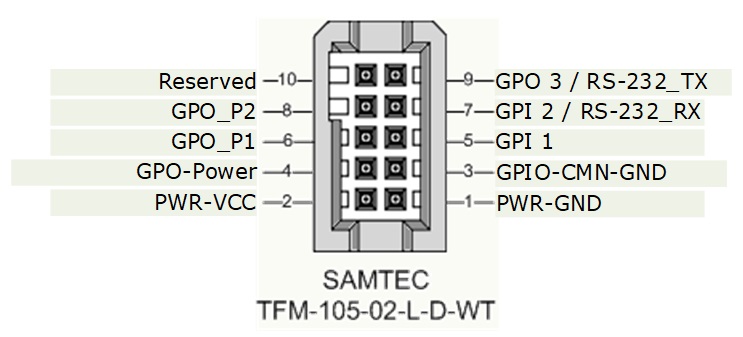
|
Pin Number |
Genie Nano-10G |
Direction |
Definition |
|
|---|---|---|---|---|
|
1 |
PWR-GND |
— |
Camera Power – Ground |
|
|
2 |
PWR-VCC |
— |
Camera Power – DC +10 to +36 Volts |
|
|
3 |
GPI0-CMN-GND |
— |
General Input/Output Common Ground |
|
|
4 |
GPO-Power |
— |
General Output Common Power |
|
|
5 |
GPI 1 |
In |
General External Input 1 |
|
|
6 |
GPO 1 |
Out |
General External Output 1 |
|
|
7 |
RS232_RX |
In |
RS-232 Serial Port Input for G5-Gx4 models |
|
|
GPI_2 |
In |
General External Input 2 with G5-Gx3 models |
||
|
8 |
GPO 2 |
Out |
General External Output 2 |
|
|
9 |
RS232_TX |
Out |
RS-232 Serial Port Output for G5-Gx4 models |
|
|
GPO 3 |
Out |
General External Output 3 with G5-Gx3 models |
||
|
10 |
Reserved |
|
Do not use. |
|
|
NOTE: |
Differs from previous Genie Nano models; if upgrading verify cable connections. |
|||
Nano: “G6-GM4… or G6-GC4…” part numbers denote optional Serial Port special order models.
Using the Special Order Serial Port
The Nano-10G provides a UART RS-232 serial port for general use where the Nano-10G functions as an Ethernet to serial port bridge only, because the Nano-10G itself does not respond to any serial port commands. An external serial controlled device can be connected to the camera serial port to benefit from the extended control distance provided by the camera Ethernet connection. Examples of such devices might include lighting, motors, remote switching, various sensors, and so forth. The following figure shows an example of such a setup.

|
NOTE |
|---|
|
Special order RS-232 serial port Nano-10G models do not support power-over-ethernet (PoE) due to grounding issues. |
Enable the Virtual Serial Port Driver
The Virtual Serial Port Driver is automatically installed with the Sapera installation. Even if the Nano-10G is used only with third-party GigE Vision applications, usage of the serial port requires that it is installed and enabled by using the Teledyne DALSA Network Configuration tool.
To enable the serial port driver
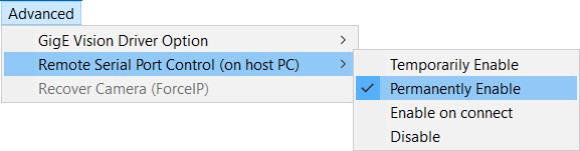
-
Run the Teledyne DALSA Network Configuration tool.
-
On the Advanced menu, open the Remote Serial Port Control (on host PC) submenu and select Permanently Enable.
Automatic Windows Driver Installation
The first time the remote serial port control is enabled on a system, an automatic Windows driver update executes as shown in the following screen captures.
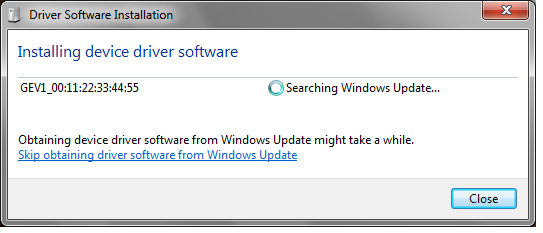
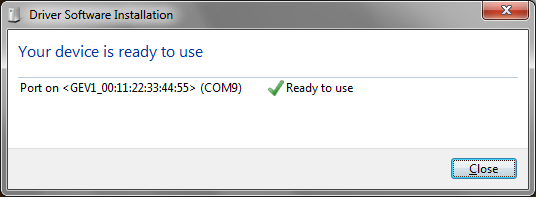
This update procedure will not repeat on an update unless the serial port control is first disabled and then followed by an uninstall of the Nano-10G driver.
Selecting Serial Port Parameters
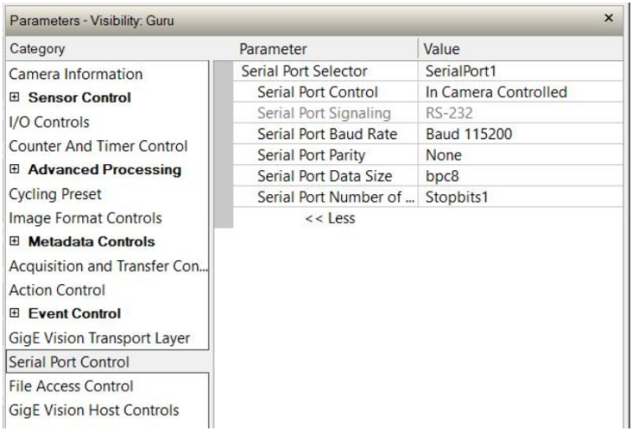
The Sapera CamExpert tool allows selecting a camera serial port and viewing its current configuration.
-
With the Port Control set to RemoteHostControlled, use any third-party serial communication program to configure the serial ports and control connected devices. Note that currently, only the Baud rate is variable (within the software control’s capabilities).
-
With the Port Control set to InCameraControlled, port parameters are set by Genie Nano-10G features.
Serial Port Control Category
The Serial Port Control category groups the features related to the optional RS-232 UART serial port.
|
Display Name |
Feature & Values |
Description |
Device Version & View |
|---|---|---|---|
|
Serial Port Selector |
DeviceSerialPortSelector |
Selects the serial port to control. |
1.00 Guru |
|
SerialPort1 |
SerialPort1 |
First Serial Port available on the device. |
|
|
Serial Port Control |
deviceSerialPortControlMode |
Specifies whether the device serial port is controlled by the device itself or remotely controlled by the host computer. |
1.00 Expert DFNC |
|
Remote Host Controlled |
RemoteHostControlled |
Local serial port is controlled by the host computer. |
|
|
In Camera Controlled |
InCameraControlled |
Local serial port is controlled by the camera itself. |
|
|
Serial Port Signaling |
deviceSerialPortSignaling |
Displays the current serial port signaling protocol in use by the device. This feature selects the protocol if multiple types are supported. |
1.00 Expert DFNC |
|
RS-232 |
RS232 |
Use RS-232 signaling protocol. |
|
|
None |
None |
No signaling protocol. |
|
|
Serial Port Baud Rate |
DeviceSerialPortBaudRate |
Sets the baud rate used by the selected device’s serial port. Available baud rates are device-specific. |
1.00 Expert |
|
Baud 9600 |
Baud9600 |
Baud rate is 9600. |
|
|
Baud 115200 |
Baud115200 |
Baud rate is 115 200. |
|
|
Serial Port Parity |
deviceSerialPortParity |
Sets the parity checking type on the selected serial port. |
1.00 Guru DFNC |
|
Even |
Even |
Use Even parity checking. |
|
|
Odd |
Odd |
Use Odd parity checking. |
|
|
None |
None |
Parity checking is disabled. |
|
|
Serial Port Data Size |
deviceSerialPortDataSize |
Sets the bits per character (bpc) to use. |
1.00 Guru DFNC |
|
bpc8 |
bpc8 |
Use 8 bits per character. |
|
|
bpc7 |
bpc7 |
Use 7 bits per character. |
|
|
Serial Port Number of Stop Bits |
deviceSerialPortNumberOfStopBits |
Sets the number of stop bits to use. |
1.00 Guru DFNC |
|
Stopbits0 |
Stopbits0 |
Use no stop bits. |
|
|
Stopbits1 |
Stopbits1 |
Use 1 stop bit. |
|
|
Stopbits2 |
Stopbits2 |
Use 2 stop bits. |
 ©
©